Wednesday, December 31, 2008

Here is another technique from the Card Instruction Book that I received as a gift. This one is called Build Borders. It was a great idea and I used some different colors that I normally don't seem to reach for that often.
First of all I used a Stampin' Up! wheel for my background. The wheel that I used is called Watercolor Vine. I learnt that the easiest way to use a wheel for a background is to start in the center at an angle and wheel across your card in one stroke. After that wheel on either side, this makes for a more natural looking card and it doesn't look like you used a wheel. See how its all blended together. I am using Stampin' Up!'s Always Artichoke for my main color and card, and also used Stampin' Up! Classic Always Artichoke ink. I am going to be using Stampin' Up! Pocket Silhouettes stamp set. Why you ask, well I just got it and I am playing today!


Then I checked my Color Coach again for contrasting colors, what would I do without it?! But better question, how did I manage before I got it?! My two contrasting colors will be Elegant Eggplant and Bravo Burgandy. I randomly stamped my Elegant Eggplant and then adherred it to my Bravo Burgandy. My focal point was one of the Pocket Silhouettes stamped in Versamark on Very Vanilla and embossed with Copper Embossing Powder, I will layer that on a scrap of Rose Red.


Check out my finished card! Isn't it elegant? And a perfect birthday card for an older more mature person. I just loved how it turned out.
This card is also available as a Card Kit or can be purchased separately.
Maybe you need an assortment of birthday cards, just look through some of my older posts and let me know what you like.
As always thanks for stopping in, now lets see what the next technque will be.................Layer Inks. Ummm sounds interesting, stay tuned.

Tuesday, December 30, 2008

Simple Birthday Card

I received three "stamping" books as gifts from my mom, and while leafing through them I thought I would try a couple of the cards that they had illustrated. So you are probably wondering where are they, lets have a look. Nope into the garbage they went!! While I liked the technique, I didn't care for the design or the look. So I made my own tutorial for a simple birthday card.


This card uses just one stamp set, from the main image to the background.

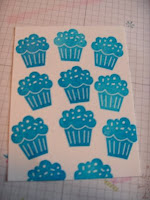
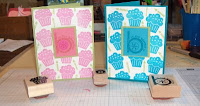
First I stamped ramdom cupcakes from the Stampin' Up! Party Hearty on Whisper White Cardstock using Tempting Turquoise Classic ink.


It looks okay at this point, BUT we need a contrasting color to really give it something. To my Color Coach to see what contrasts with Temping Turquoise = Certainly Celery!!


This is now our background or our card. For the main part of the card, I cut a piece of Temping Turqouise cardstock and will adhere this piece as a layer.
At this point I am really starting to like this card. We didn't have to invest in a separate background stamp, we made our own!


When I made any card, because your cardstock is 8 1/2 x 11, I can get two cards. So I always try to make two cards. So my second card will be the pink version. Or rather Pretty in Pink on Certainly Celery for my main part of the card.


Now for the focal point of the card. I stamped the "b" is for birthday using Versamark ink on the same colored cardstock, and then used Irridescent Ice Embossing Powder. I used a scrap of Certainly Celery for my bottom layer.


I then embossed another center for my "b" and embossed that also, used the 1/2" punch to punch out that center and attached it to the card using a demension.
And here is the finished cards!
Aren't they cute?! These cards will make a lovely card to give to a child of any age!
Both of these cards are available as card kits or can be purchased already assembled. So if you are looking for some great birthday cards, let me know. ALSO this card would make a great birthday invitation, don't you think?!
The card kits are $20 and you receive everything that you need to create 12 cards, plus step-by-step instructions.
I am going to keep trying some of the other techniques/ideas that are in the instruction book but I have decided I will just use the book as an idea and come up with my own card. That way I won't get so frustrated, if you know what I mean. Have a great day and thanks for stopping!


Monday, December 29, 2008

Happy Birthday Friend!


What a Cute Birthday Card Right?! It might be cold here but I can't help but think about halter tops. And who doesn't have a friend that could use such a card, be it for a dreaded "over the hill" birthday or just a fun pick-me-up.
This was a fun card to make and it uses two of Stampin' Up!'s favorite punches. Word Window and Scallop Circle.
The bikini top is made using designer paper.
The sentiment says it all:
"Your friendship is the most uplifting thing in my life without underwire!"

Saturday, December 27, 2008

Birthday Cards


Its time to start replinish my cards! I have some samples that I cased from Splitcoast Stampers and here is one of them. I realize that the card looks very orange and it really isn't. Its pumpkin pie.
Stamps: Retired All About Occasions Hostess Stamp Set
Inks: Pumkin Pie, Kiwii Kiss, Not Quite Navy
Cardstock: Pumpkin Pie, Very Vanilla, Not Quite Navy
Accessories: 2-way glue pen, Dazzling Diamonds Glitter, Ribbon & Orange Staple

Wednesday, December 24, 2008

Merry Christmas!

Here is our Christmas tree for this year, I tried taking a picture of it with the lights on and I don't if its something with my camera or what, but it wouldn't take. The tree is complete even with a little teddy bear on top! Actually when I got ready to decorate the tree, I couldn't find the tree top ornament so the teddy bear was elected.

May you have a Blessed Christmas and Happy Year! And lets hope it isn't as cold after the holidays!

Monday, December 22, 2008

Christmas Hot Chocolate Packets


I made these Hot Chocolate Packets as gifts for co-workers, super fast and fun! All it takes is a card size piece of cardstock, folded twice in middle, cut the corner off, decorate, tape your packet of hot chocolate inside and tape the candy cane to the back with the hook hanging over the front. The candy cane also acts as a way to keep the card closed. What a great idea right?


Here is a close up of the card. I used Brocade Blue Cardstock and ink, with Real Red cardstock as the contrasting color.

Sunday, December 21, 2008

Christmas Name Frames

I have had this idea to make a name frame for my mom and dad for awhile and just had to wait

until I got my Big Shot Scallop die. Well I got it and I set to work creating this name frame. The photos hanging from the frame are attached using fishing line. Each photo is a picture of a member of our family at different times in our lives. The pictures of both sets of grandparents mean alot to me and I may have to make one for myself. I really think that Christmas is a special time and also a special time to remember our "Family."

This name frame I made for my sister, Becker is our last name, well at least its her's. Its my maiden name. She lives in Southern California now and I know she has mentioned that even though she lives in California, Wisconsin is still home. So I am hoping that this will bring alitle of Wisconsin back to her.

Saturday, December 20, 2008

Merry Christmas from Our House to Yours


My wish for all of you is a very blessed Christmas and Happy New Year. Thanks so much for taking time out of your day to visit my blog. Cindy

Sunday, December 14, 2008

Christmas Candles


What a great gift idea for a firend--just wrap a jar candle with designer paper, then add some ribbon and embellishments and you are ready to spread some holiday joy!

Tuesday, December 9, 2008

Stampin' Up! Retirement List and Free Shipping!

Retirement List & SALE PRICES!!!!
The MUCH anticipated retirement list is HERE!!!! PLUS they're on sale for 10% off!!!! Please see the special FREE shipping below....

Click on the links below to view the retirement lists and the sale prices...

Alphabetical:
http://www.stampinup.com/us/documents/Retired_Lists_US1.pdf
Numerical:
http://www.stampinup.com/us/documents/Retired_Lists_US2.pdf
Sale Prices with 10% OFF:
http://www.stampinup.com/us/documents/US_10_percent_off.pdf

Stampin' Up!'s gift to you, FREE SHIPPING!

From December 9 through December 23, all workshop and customer orders of $70 or more will receive free shipping from Stampin' Up!

FREE SHIPPING ON ALL LOCAL ORDERS RECEIVED BY 12/15!!!!!

So what are you waiting for?! Email me at budy98@yahoo.com, lets take advantage of 20% off and FREE Shipping!!

Sunday, December 7, 2008

Cool Dudes Gift Card

This is a gift card that I made using the Cool Dudes Stampin' Up! stamp set. Same concept as yesterdays Season of Joy Gift Card. I think I like this one the best. I added a snowflake and Night of Navy Grossgrain ribbon. Notice anything else? Well instead of scanning the card, I took a picture of it, I think it looks okay. Its always so hard to get the photo to turn out so that you can see the detail.

Thanks for stopping by, stay warm. Temps are suppose to get real cold here, below zero! Brrrr.

Saturday, December 6, 2008

Christmas Gift Card Holders

I just got done making some Christmas gift cards. They are really pretty easy to make and such a simple conscept! The white part of the card is just an envelope folded in half. Cut the flap at the fold, seal the left side of the envelope and cut off the top flap. As you can see from the second card, that is where your gift card goes.


Recipe: (All Stampin' Up!)
Stamps: Season of Joy
Cardstock: Always Artichoke, Purely Pomagrante
Ink: Purely Pomagrante

Come back tomorrow, I have another gift card to show you, Its Cool!

Friday, December 5, 2008

Snow Swirled Christmas!


How do you like my new header?! This is what the woods looks like next to our house! Typical Wisconsin Winter scenery! Almost matches my latest card I think, what do you think?
I also want to take this time to thank you all for wonderful comments that I have received on other cards that I have posted, it means so much to me.
Recipe: (All Stampin' Up!)
Card Stock: Hunter Green, Very Vanilla, Vellum, Brushed Gold
Ink: Night of Navy
Accessories: Gold Embossing, Very Vanilla Ribbon & Gold Cord
Quite different for me, more of an elegant card I think, as always thanks for stopping by, and take care. For me its stay warm!

Thursday, December 4, 2008

Welcome Christmas into Your Hearts!

If I had a better camera, I would take pictures instead of scanning my cards. This card is really quite pretty in person, believe me.
Again simple and not too many layers.

Recipe: (All Stampin' Up!)
Cardstock: Brilliant Blue, Always Artichoke, Rose Red, Designer Paper
Stamps: Figures of Speech (retired), Heard from the Heart
Accessories: Embossing in Silver

Wednesday, December 3, 2008

Cool Dudes Shaker Card

Here is my variation of the Shaker card technique. I am also finding that I am not doing as many whole card layers. With postage, it just makes sense to make simple cards.

Recipe: (All Stampin' Up!)
Cardstock: Real Red, Whisper White
Ink: Real Red
Stamps: Cool Dudes, Punch Pals
Accessories: Fake Snow, Red/white Stripped Ribbon

Tuesday, December 2, 2008

Punchy Seasons Greetings!


This card is a simple variation of the "Shaker" card. At a recent stamp-a-stack, my upline, Kelly, taught us how to make this card. Isn't it cute?!

We used fake snow in the "shaker" part, it takes a bit more time to make this card, but its so worth it! Again the Top Note Die was used, BUT this time you cut it in half.

Recipe: (All Stampin' Up!)

Cardstock: Baha Breeze, Whisper White

Stamps: Punchpals

Monday, December 1, 2008

Happy Holidays!


This card uses the Top Note die, and the Photo Window Punch! I never thought that I would use the Top Note die as much as I do, which you will see the rest of this week!
Recipe: (Everything by Stampin' Up!
Cardstock: Kraft, Chocolate Chip, Very Vanilla, Glorius Green
Ink: Chocolate Chip
What a fast and easy card to make, a little Dazzeling Diamonds on the tree branches, some cord tied on the tree trunk and your done!

Sunday, November 30, 2008

Happy Thanksgiving!


I hope that everyone had a Happy Thanksgiving, whether you spent it with families or friends.
My husband, my son and myself spent our Thanksgiving with friends. My mom and dad and sister are in Florida but we'll be together at Christmas time.
It was so nice to have a four day weekend, we enjoyed being with our close friends and spent the majority of our time outside. We had pretty good weather, not too cold yet; had a lovely dinner with Tom and Karen; laughed and got caught up with the rest of the group. It was great!! We'll miss them now as everyone will now get back to reality at their respective homes and jobs.
The above card I made, it was created by my upline, Kelly, which she shared with us at a recent workshop. Don't you just like the concept of running the Leaf Die Cut using cork!! Yep thats cork what a great idea!
Stayed tuned the rest of this week, I have some great cards to show you. While everyone else was headed home, I was in my stamping studio playing and watching it snow! So everyday this week, I will have a new card to share, stay tuned!

Wednesday, November 26, 2008

Christmas Snowflakes


Here is another card that I made the other night, I cased this card from my upline, Kelly; and just changed the colors just alittle bit. I tend to get in a habit of using the same colors so this one was different.

Recipe-Stamps: Stampin' Up! Cool Dudes, Heard from the Heart

Cardstock: Whisper White, Pacific Point

Accessories: Snowflake Die, Large/Small Tag Punch, Silver Brads

Monday, November 24, 2008

Season of Joy Christmas Card

I was at it again, making more Christmas cards, I really enjoy making Christmas cards so this time of year you will find me making many different Christmas cards. I never make the same card for everyone, usually just 5 cards of each design. I figure I might as well enjoy myself too and there are so many different Stampin' Up stamps that I enjoy, I can never pick just one!

Recipe:
Stamps: Stampin' Up! Season of Joy
Cardstock: Whisper White, Real Rose
Accessories: Silver Embossing, Snowflake Embossing Folder, Dimension

Don't you just love this card, its really simple but yet really pretty!

Wednesday, November 19, 2008

Snowman Kisses!


These cute little gifts are called, "Snowman Kisses". Another cute project for our local gift shop. The inside is a box of Tic Tacs along with the following poem:
Snowman Kisses
He's cute, cuddly, &
full of warm wishes.
Here's some heartfelt
Snowman Kisses
Need a neat gift, try making these, they are cute, easy and thoughtful. I sell them for $2.00 a piece plus postage.

Tuesday, November 18, 2008

Beautiful Christmas Card


When I went to a Stampin' Up! workshop last weekend, I just fell in love with this card. My upline taught us how to make icycles using Crystal Effects; I think that just makes the card special.
Recipe: (All by Stampin' Up!)
Cardstock: Baja Breeze, Night of Navy, Designer Paper
Ink: Night of Navy, Baja Breeze
Accessories: Crystal Effects Icycles, Dazzeling Diamonds Glitter
If you click on the card, you can see it larger and really see the detail. Isn't beautiful?!

Sunday, November 16, 2008

Snowman Soup


I have been busy making more gifts to sell at the local gift shop. Another favorite from last year, Snowman Soup Packets. I changed the design but the poem is the same. All it takes is a package of cocoa, marshmellows, and a candy cane. Super easy and what a great gift to give to the teacher, babysitter, mailman, newspaper person, or UPS man!!
Don't have time to make these gems, email me, I sell them for $2.50 a piece plus postage.

Monday, November 10, 2008

Rub on Some Cheer!


Could it get any better, Stampin' Up is offering a Rub On promotion, Get 20% off all Rub-Ons when you spend $20 on Stampin' Up! products.

For only $8.76 per package (regularly $10.95), you can get any of Stampin' Up!'s fun and unique Rub-ons that can be used on cards, scrapbook pages, crafting projects and more!


This offer is only good through November 30, so Contact Me Today!

To see which Rub-ons are available, go to the Stampin' Up! Website: http://www.stampinup.com/us/enu/default.asp

Sunday, November 2, 2008

November Card Kit

Today I was busy decorating these jumbo clothespins that I found. These clothespins will be taken to the local craft shop and offered for sale.

After I was done with that, I decided to make a card for the Monthly Card Kit.
This kit includes all of the consumable supplies you will need to create 12 cards. In addition, you'll receive detailed, step-by-step instructions on how to complete the card design. Each kit comes pre-stamped, all you do is assemble.
This card features the Stampin' Up! stamp set, "Two Cool Dudes". What a fun set, you can use this card for a Christmas card, or send it after the holidays as a "Thinking of you!"
Like the design of the card and already own the stamp set featured? Order just he Semi-Made Card Kit ($10). Each kit also includes decorated envelopes.
Orders for the card kits must be received by November15th. You will receive the kits by the 30th of November.
The Card Kit ($20) Includes:
* 12 pieces of 6"x6" Whisper White Cardstock, Dry Embossed

* 12 pieces of 4 1/2" x 3 3/4" Night of Navy Cardstock

* 12 pieces of 3" x 3 1/2" Night of Navy Cardstock

* 12 pre-cute Night of Navy Grosgrain Ribbon


Add-On Products:
* Two Cool Dudes Stamp Set, 4 pieces, DIE-CUT ($21.95)

* Night of Navy Classic Stampin' Pad ($5.25)

* Night of Navy Grosgrain Ribbon ($4.95)


Tuesday, October 28, 2008

Snowman Chapstick Holders

I haven't blogged in awhile as I am starting a special project, BUT while I wait for my materials to get here, I made some Snowman Chapstick Holders.

These holders will be offered for sale at the local craft shop. Last year the chapstick holders were a big hit and I am hoping that they will be again this year! I realize that "Frosty" is a retired set, but he has been such a versatile stamp set that I still find myself reaching for him.

I also plan to make some Snowman Kisses holders, Snowman Soup Pouches and Reindeer Food Pouches. If you want to see the Chapstick Holders closer, just click on the photo. Hopefully I will have time to take some pictures of them and get them on here. If you would like the directions, send me an email! Thanks for stopping in!

Wednesday, October 15, 2008

Stampin' Up and Country Living Magazine


Invite the warmth and coziness of the holidays into your home with Stampin’ Up!’s® Country Living Holiday Collection Stampin’ Kit. this kit has everything you need to create beautiful handcrafted ornaments.
Subscribe to Country Living magazine at a 75% discount and get a bonus mini-stamp kit! Go to stamp.countryliving.com.
Country Living Holiday Collection Stampin' KitCustomer Order Dates: November 1 - December 31, 2008 (or while supplies last) Contact me for additional details.
Country Living and Stampin' Up! have partnered to create the Country Living Holiday Collection Stampin' Kit that will be featured in Country Living's December issue.
Isn't this a great promotion?!

Monday, October 13, 2008

Happy Birthday Stampin' Up!!


Stampin' Up! is celebrating their 20th birthday - and you get the presents!!
*Select birthday themed sets will be 20% off with any $20 purchase.
*You can also purchase the large tip AquaPainter for a special price!
*Decor Elements Phase 2 will be available. Wait until you see what they have for you!
*Host a workshop that totals $350 or more, and receive any set from the Sampler. Be sure to check the back your sampler for more specials! You can also order on-line now!
And last but not least - you will be able to order from the Holiday Mini!

Here is the website: http://www.stampinup.com/us/enu/default.asp

All I can say, "How cool is that!!"


Sunday, October 5, 2008

Christmas Card Kit


As promised here is the Christmas Card Kit.


This kit includes all of the consumable supplies you will need to create 12 cards. In addition, you'll receive detailed, step-by-step instructions on how to complete the card design. Each kit comes pre-stamped, all you do is assemble!


This is such a neat card, I am sure you will be very happy with the results and the satisfaction of making a special Christmas card. These cards will make you feel good and show that special someone how much you care.
Like the design of the card and already own the stamp set featured? Order just the Semi-Made Card Kit ($10). Each kit also includes envelopes.
Orders for the Christmas Card Kits must be received by October 31st. You will receive the kits by the 15th of November.

Special Offer for October! Purchase the Card Kit, Season of Joy stamp set, Rhinestone Brads, Brocade Blue Classic Ink stamp pad and Whisper White Grosgrain Ribbon AND receive a copy of the 2008 Fall/Winter Idea Book & Catolog FREE!!!!


The Card Kit ($20) Includes:
* 12 pieces of 6"x 6" Brocade Blue Cardstock, Dry Embossed
* 12 pieces of 4 1/2" x 3 3/4" Night of Navy Cardstock
* 12 pieces of 3" x 3 1/2" Brocade Blue Cardstock
* 36 Silver Brads, Round
* 12 Crystal Brads


Add-On Products:
* Season of Joy Stamp Set, 8 pieces, DIE-CUT($26.95)
* Brocade Blue Classic Stampin' Pad ($5.25)
* Rhinestone Brads - Circle Ice, 80 pieces (10.95)
* Silver Round Brads - 200 pieces ($6.95)


If that isn't enough, I also made the above card in another color, Red Riding Hood, Mellow Moss and Creamy Carmel.

BOO to You!!


I have seen alot of "Punch Cards" on different websites and blogs that I visit and thought I had to give it a try. I liked how my "boo" card turned out and it will make a cute Halloween card, but it did seem strange not to do much stamping on the card.
Cardstock: Pumpkin Pie, Black, White, Glorious Green, Kraft
Ink: Really Rust, Always Artichoke
Punches: Small Oval, Large Oval, Small Tag
Stamps: Weather BG, Flannel Plaid BG
I have some other cards up my sleeve, so stay tuned. Feel free to leave a comment, I love hearing from you! Take Care!

Thursday, October 2, 2008

Thanksgiving Card Kit


Do you love having cardstock pre-cut for you? Then this is for you!


Each month I am going to be featuring a different card, the price of the card kit is $20. This kit includes all of the consumable supplies you will need to create 12 cards. In addition, you'll receive detailed, step-by-step instructions on how to complete the card design. Each kit comes pre-stamped, all you do is assemble! Don't feel that you need 12 cards, you can order half a order and only receive the supplies to make 6 cards for $10.


Like the design of the card and already own the stamp set featured? Order just the Semi-Made Card Kit ($10). Each kit also includes envelopes.


Orders for the Card Kits must be received by October 15th. You will receive the kits by the end of the month.


Special Offer for October! Purchase the Card Kit, Lovely as a Tree stamp set, Holiday & Wishes stamp set and Earth Elements Stamping Spots AND receive a copy of the 2008 Fall/Winter Idea Book & Catolog FREE!!!!


The Card Kit ($20) Includes:

* 12 pieces of 6"x 6" Creamy Carmel Cardstock

* 12 pieces of 4 1/2" x 3 3/4" Chocolate Chip Cardstock

* 12 pieces of 4 1/2"x3 3/4" Glossy Cardstock, embossed.

* 48 Punched Photo Corners

* 24 Brass Brads


Add-On Products:

* Lovely as a Tree Stamp set ($25.95)

* Holiday & Wishes Stamp set ($17.95)

* Canvas Stamp ($17.95)

* Earth Elements Stampin Spots, set of 12 ink spots ($22.50)

* Vintage Brads, 200 per container ($8.95)
Because some of you might want to get a head-start on your Christmas cards, later this weekend I will upload the Christmas Card Kit. Stay tuned!


Wednesday, September 24, 2008

Happy Halloween

I know, its alittle early for Halloween, BUT tonight I got creative and came up with this "cute" card! I was so amazed at how the card just ALL came together, I just love it!


Recipe: "Cracked Glass" Technique
Cardstock: Stampin' Up
-Tango Tangerine, Close to Cocoa, So Saffron, Chocolate Chip
Ink: Stampin' Up
-Black Stazon, Close to Cocoa, Kiwi Kiss
Stamps: Stampin' Up
-Grinning Ghouls, Lovely as a Tree, Everyday Flexible Phrases
Accessories: Stampin' Up
-Brass Brads, Glassy Glaze Embossing, True Thyme Grossgrain Ribbon, Watorcolor Crayons
-

Apple Time


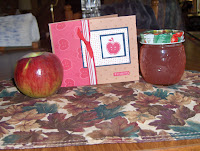
I made this apple card and I just had to also share a picture of my beautiful apples that we have on our tree this year and the apple jelly that I just made this last weekend. I had never tried to make jelly before and it turned out just great. The recipe called for boiling the peelings and cores from 25 apples and then straining it. That is why my jelly is the prettiest shade of pink!
Now for my card, I used the Stampin' Up Tart Tangy stamp set, I just love this set! The cardstock is SU Creamy Carmel, Night of Navy and Whisper White and Tart & Tangy Designer Paper. The ink was SU Real Red. I finished the card by using SU Grossgrain ribbon in red/white stripe and red.

Sunday, September 21, 2008

Random Act of Kindness Card

Here is a card that I just made, my upline emailed a request for a RAK card be sent to one of our fellow downlines. It was just the "kick" that I needed to start stamping again! What was wrong, how could I have lost the interest to stamp? To be perfectly honest, I don't know, but I am going to start stamping again, thats for sure. I think the biggest thing is I want new "stuff" and I haven't been able to order yet. But thats going to change I hope because I have my order ready to go and this Thursday is going to be Order Day!!
This "For You" card uses the Stampin' Up stamp set Fresh Cuts.
The cardstock is Tempting Turquoise, Apricot Appeal, Black and White. The ink is Tempting Turquoise, and I found a piece of White Grossgrain ribbon with little turquoise dots in it.
I like how it turned out, what do you think?

Thursday, September 11, 2008

Cute Baby Cards


I just made a couple of cute baby cards. The boy card

is kind of hard to see, the scan just doesn't do it justice.

Ingridients: All Stampin Up products

Cardstock: Whisper White, Brocade Blue and Bashful Blue (Boy)

Pixie Pink and Pretty in Pink (Girl)

Stamps: Cause for Celebration, Heard from the Heart, Taggers Dozen

Ink: Pixie Pink, Brocade Blue

Accessories: Scallop Punch, Round Scallop Punch, Circle Punches

Thanks for stopping by, I realize that my blog isn't real fancy, and I don't teach you something when you stop by, but its me and I have fun with it. If you see a card you like, email me at budy98@yahoo.com My cards are for sale individually or I can cut out the cards for you and send it to you as a kit. The kits are affordable, all you have to do it put them together.

Tuesday, September 9, 2008

The Ehlers Annual Bow Party


About four years ago, my husband and I decided that we wanted to have a cookout and invite our friends. We are really not the volleyball playing type. So we came up with a bow or archery shoot, invited our hunting friends and their families and have made it an annual event!
My husband usually makes the meat on the grill, I make a salad, our son sets up the targets and all our friends bring another dish to pass and we have a great time! We never thought that this would turn out to be such a fun event. We look at it as our way of saying a sad good-bye to summer and a happy HELLO to fall!
Thanks for stopping by, my husband and I are off the next few days. We are heading north; actually northern Wisconsin to be exact. I can't wait, I really feel that I need a vacation.

Thursday, August 21, 2008

Rub-Ons, Who would have thought?!

Stampin' Up introduced Rub-Ons sometime ago, and I, like everyone, thought, "Well thats great, I better order some." And I did and then I did what alot of people do, didn't use them!! I wonder why people do that. Have to have something and then you either forget about them OR you just don't know what to do with them. In this case, I thought, "Ohhh these are so pretty, I will just save them for something special." Yeah right, save them and never use them.

So last weekend I got into a painting mood and if you knew me, you would know that I absolutely hate to paint!! I put it off forever, BUT we are having friends over Labor Day weekend and the picnic table needed a coat of paint, and I really should paint the front steps too. So last Saturday, I started looking in the basement for some paint for the steps, the rust colored paint was dried up; thats okay because I found some hunter green paint, and the steps look pretty good. Then my mom gave me some gray paint for the picnic table, and that looks pretty good too. But then I am thinking about the little bit of green paint that I have left and I just know that the next time I paint (hopefully years from now) that paint will be dried up too!! But then I see this folding chair that I had just gotten from my mom and I am thinking.......thats just the right size to use up this paint! The chair was one that was my grandma's. Its a wooden folding chair and guess what color it was...........blaze orange!!

So after I got the chair painted and it was dry, I thought, you know those rub-ons I bought months ago............wouldn't that look pretty on the back of the chair. Last night I set out to see if I could get them on the chair, I had read the directions, read the reviews on Splitcoast, can't be too hard. And the best part, it wasn't!!

Isn't it great??!! I think my chair turned out just lovely!


I am just so happy with the results!! In the catolog it says that the Rub-ons are easy to apply and add visual interest to any card stock, patterned paper or stamped image. Well I have proof that they were easy to use and this chair is now a visual work of art!!

I am only sorry I didn't take a before picture; because the now picture is just so nice.


I want to explain this last picture, I wanted to set up the shot so that it would really show off my new chair!! So I set it next to my beautiful planter of Impatients and the also inherited watering can that I got from Grandma. Its just a pretty picture and I think Grandma is looking down and say, "Oh isn't that lovely!"

So checkout the Rub-Ons in the Stampin' Up catolog, there are 2 pages of different designs and they are all reasonably priced. Just turn to page 178 and page 179. You get 2 sheets of 5 7/8" x 12" rub-ons, one sheet in either Basic Black and one sheet in Whisper White or one sheet in Chocolate Chip and one sheet in Whisper White. Thats right 2 sheets in each package. There are Christmas, Halloween, Flowers, School Days, and so many more to choose from. Tell me what you think of my chair, I'd love to hear from you!

Monday, August 11, 2008

The New Fall/Winter Stampin' Up Catolog is Here!!

Fall-Winter 2008 Idea Book & Catalog Now Available!
The brand-new Fall-Winter 2008 Idea Book & Catalog is here, and it’s brimming with new stamp sets, accessories, and ideas. Contact me today to get your copy!


Isn't it beautiful!! I just got my copy today and have been browsing it from cover to cover. There are alot of new stamp sets along with some classics from the last catolog.


Never-Before-Seen Stamps at Never-Before-Seen Savings!
Never before has Stampin’ Up! offered a discount on brand-new stamp sets. But from August 11 through September 30, you can save 15 percent on select brand-new stamp sets, with no additional purchase necessary!


Join the Stampin’ Up! Family for Only $99!
Becoming a Stampin’ Up! demonstrator has never been easier! For a limited time, you can choose one of three different Starter Kits—stamp–focused, scrapbook–focused, or home décor–focused—and each one is only $99 (including business supplies)!Or, choose the standard Starter Kit—featuring $350 of stamping and business supplies for only $199—and get a stamp set of your choice from the new catalog for FREE!

To take advantage of one or both of these offers, contact me today!