What a fun technique this was, when I was making up the cards, I thought that this was such a great technique, one that I was sure that my ladies would like. I wasn't wrong!! I love techniques that are not so hard that you can't recreate these cards with your own stamps and supplies.
Create
a striking background using Designer Series Paper. Cut Four 1 ½ x 4 inch pieces
of DS paper, but these diagonally and set up with the point of the triangle
pointing down. Arrange to your likin, glue to a piece of cardstock that you
have marked the middle on.
Here are the cards that we made:
Card 1 – Autumn Wishes Burst
Stamp Sets: Among the Branches, Thankful
Forest Friends (inside verse)
Ink: Chocolate
Chip, Tangerine Tango, Delightful Dijon, Cajun Craze
Paper: Tangerine Tango Base 5 ½ x 8 ½
Daffodil Delite Layer 4 x 5 ¼,
Whisper White 5 x 2 ¾, Very Vanilla Layer 5 x 3 ¾
Accessories: Burlap Ribbon, Dimensions,
Scallop Punch, Circle Punch, Glue sticks, Glue Dots
**For the “Star Burst” start
with 4
- 1 ½ x 4 inch strips of DS paper.
Take these strips and cut them in half DIAGONLLY, place upside down with
point of triangle pointing down on your scratch paper. Rearrange for the effect
that you would like. Take the 5 x 2 ¾ white cardstock and mark the middle. Cover the entire white cardstock piece with
glue stick. Put one of the triangles
with the point to the right of the middle mark and one to the left of the
middle mark. Keep adding on each side of
this triangle making sure that your white cardstock is completely covered. Once down, trim from the back using scissors
all the way around your white cardstock. Now adhere this piece to the 5 x 3 ¾
piece of cardstock, stamp sentiment at the bottom.
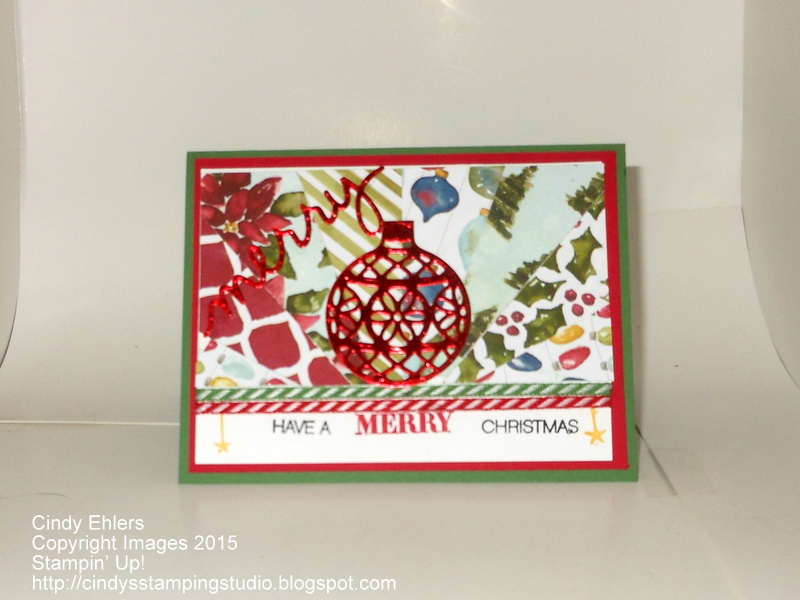
Card 2 – Merry Christmas Starburst
Stamp Sets: Holly Jolly Greetings
Ink: Black Memento, Crushed Curry,
Black & Red Markers
Paper: Garden Green Base 5 ½ x 8 ½
Real Red Layer 4 x 5 ¼, Whisper
White 5 x 2 ¾ & 5 x 3 ¾
Accessories: Red & Green stripped ribbon, Red Foil cardstock
3 ¼ x 2 1/2 , Ornament Thinlet, Christmas Greetings Thinlets (Merry)
Fancy Project – Thanks & Giving Half Fold
Stamp Sets: Light Hearted Leaves
Ink: Chocolate Chip, Tip Top Taupe,
Versamark
Paper: Pear Pizazz Base 5 ½ x 7 ¼
(score at 4 ¼),
Chocolate Chip Layer 2 ¾ x 5 ¼,
Taupe Front 4 ¼ x 3 ¼, DS paper 1 x 4 & ½ x 5 ¼
Accessories: Autumn Wood Accents, Leaflits Framelits, Fine Tip
Glue Pen, Dimensions
There you have it!! The October Technique class is in the books, but I do have these cards available for purchse, just send me a message and find out more details!!
Join us either in person or as a kit for the November Technique Class, the technique will be "Gently Falling Background" it looks like it is going to be fun!!
******************************************************************
Whats Going On:
October Kit Class - Tuesday, October 27, 2015; 6:30 p.m. at
Schmitty's Restaurant basement.
November Card Buffet - Saturday, November 7, 2015; 8:30 a.m. to Noon at Schmitty's Basement. November Technique Class - Monday, November 9, 2015; 6:30 p.m. at Schmitty's Restaurant basement
November Technique Class - Wednesday, November11, 2015; 6:30 p.m. at Apple Valley Bar & Grill
******************************
- Click here to see the WEEKLY DEALS - they run from Tuesday through Monday every week!
- Check out the Paper Pumpkin monthly project kit - subscribe today - PAPER PUMPKIN
- Click here to see the NEW BIG CATALOG
-
***********************************
It's so simple to shop in my online store:
Shop with Cindy!!
Thanks for stopping by, so glad that you did!!
Cindy