Friday, January 2, 2009

Isn't this Beautiful?!

Stamping Up'! is Introducing"


Phase 3 of SU’s Decor Elements:
The following tree is just over 36″ tall by 52″ wide (largest one) and comes in Chocolate Chip, Craft and White colors.


Along side it are two new sentiments (Life Milestones and Direction of Your Dreams)


To view the entire brochure go to the Stampin' Up Website, the link is in the right hand column of my blog.

Wednesday, December 31, 2008

Here is another technique from the Card Instruction Book that I received as a gift. This one is called Build Borders. It was a great idea and I used some different colors that I normally don't seem to reach for that often.
First of all I used a Stampin' Up! wheel for my background. The wheel that I used is called Watercolor Vine. I learnt that the easiest way to use a wheel for a background is to start in the center at an angle and wheel across your card in one stroke. After that wheel on either side, this makes for a more natural looking card and it doesn't look like you used a wheel. See how its all blended together. I am using Stampin' Up!'s Always Artichoke for my main color and card, and also used Stampin' Up! Classic Always Artichoke ink. I am going to be using Stampin' Up! Pocket Silhouettes stamp set. Why you ask, well I just got it and I am playing today!


Then I checked my Color Coach again for contrasting colors, what would I do without it?! But better question, how did I manage before I got it?! My two contrasting colors will be Elegant Eggplant and Bravo Burgandy. I randomly stamped my Elegant Eggplant and then adherred it to my Bravo Burgandy. My focal point was one of the Pocket Silhouettes stamped in Versamark on Very Vanilla and embossed with Copper Embossing Powder, I will layer that on a scrap of Rose Red.


Check out my finished card! Isn't it elegant? And a perfect birthday card for an older more mature person. I just loved how it turned out.
This card is also available as a Card Kit or can be purchased separately.
Maybe you need an assortment of birthday cards, just look through some of my older posts and let me know what you like.
As always thanks for stopping in, now lets see what the next technque will be.................Layer Inks. Ummm sounds interesting, stay tuned.

Tuesday, December 30, 2008

Simple Birthday Card

I received three "stamping" books as gifts from my mom, and while leafing through them I thought I would try a couple of the cards that they had illustrated. So you are probably wondering where are they, lets have a look. Nope into the garbage they went!! While I liked the technique, I didn't care for the design or the look. So I made my own tutorial for a simple birthday card.


This card uses just one stamp set, from the main image to the background.

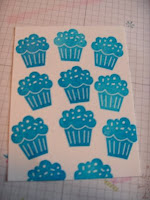
First I stamped ramdom cupcakes from the Stampin' Up! Party Hearty on Whisper White Cardstock using Tempting Turquoise Classic ink.


It looks okay at this point, BUT we need a contrasting color to really give it something. To my Color Coach to see what contrasts with Temping Turquoise = Certainly Celery!!


This is now our background or our card. For the main part of the card, I cut a piece of Temping Turqouise cardstock and will adhere this piece as a layer.
At this point I am really starting to like this card. We didn't have to invest in a separate background stamp, we made our own!


When I made any card, because your cardstock is 8 1/2 x 11, I can get two cards. So I always try to make two cards. So my second card will be the pink version. Or rather Pretty in Pink on Certainly Celery for my main part of the card.


Now for the focal point of the card. I stamped the "b" is for birthday using Versamark ink on the same colored cardstock, and then used Irridescent Ice Embossing Powder. I used a scrap of Certainly Celery for my bottom layer.


I then embossed another center for my "b" and embossed that also, used the 1/2" punch to punch out that center and attached it to the card using a demension.
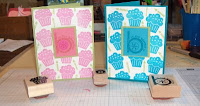
And here is the finished cards!
Aren't they cute?! These cards will make a lovely card to give to a child of any age!
Both of these cards are available as card kits or can be purchased already assembled. So if you are looking for some great birthday cards, let me know. ALSO this card would make a great birthday invitation, don't you think?!
The card kits are $20 and you receive everything that you need to create 12 cards, plus step-by-step instructions.
I am going to keep trying some of the other techniques/ideas that are in the instruction book but I have decided I will just use the book as an idea and come up with my own card. That way I won't get so frustrated, if you know what I mean. Have a great day and thanks for stopping!


Monday, December 29, 2008

Happy Birthday Friend!


What a Cute Birthday Card Right?! It might be cold here but I can't help but think about halter tops. And who doesn't have a friend that could use such a card, be it for a dreaded "over the hill" birthday or just a fun pick-me-up.
This was a fun card to make and it uses two of Stampin' Up!'s favorite punches. Word Window and Scallop Circle.
The bikini top is made using designer paper.
The sentiment says it all:
"Your friendship is the most uplifting thing in my life without underwire!"