Friday, December 16, 2016

December Technique Cards

The technique is called Water Coloring with Markers, what a great way to create a professiona look to water coloring by using Markers and Aqua Painter and an Acrylic Block.  By water coloring this way creates a beautiful effect and no marker lines!!

Here are the cards that we created:

Card #1 - Snowman Christmas Wishes
Stamp Set: Christmas Magic
Ink: Memento Black
Assorted Markers
Paper:  Real Red Base, Presents and Pine Cones Designer Series Paper Layer, Mint Macaron, Shimmery White
Accessories: Dimensions


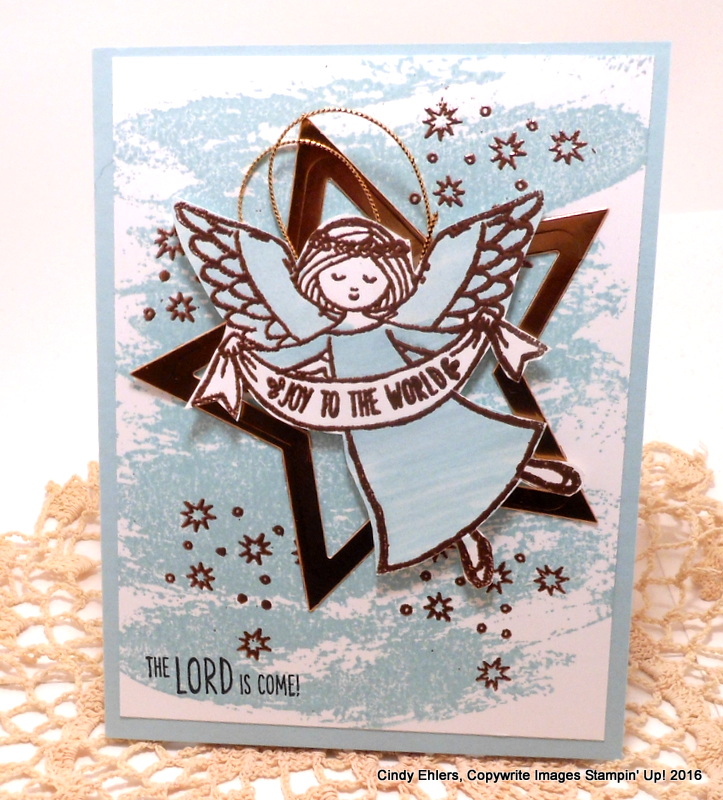
Card #2 - Merriest Wishes
Stamp Set:  Christmas Magic
Ink:  Memento Black
Assorted Markers
Paper:  Smokey Slate Base, Cherry Cobbler Layer, Whisper White
Accessories:  Oval Framelit, Duet Banner Punch, Dimensions


Here is the Fancy Fold Card, a Gift Card Holder.


Card #3 - Gift Card Holder
Stamp Set: Oh What Fun
Ink:  Real Red, Garden Green
Paper:  Crumb Cake Base 4 x 4 1/4, Real Red Layer 4 1/2 x 4 1/4 & 3x3
Candy Cane Designer Series Paper 2 x 10 1/2, Early Espresso 3 1/2 x 4
Accessories:  Dimensions, 2" Circle Die, Stitched Circle Die, Real Red Ribbon, Cable Knit Embossing Folder, Burlap Ribbon, Red Staples, Dazzling Diamonds and 2 Way Glue Pen, Glassiene Bag

Here is how it looks with the Glassine bag opened and which is where the gift card is placed; the Crumb Cake and Real Red Greeting Card is placed inside the bag flap.

******************************************************************************
Here is What is Happening:

SIGN UP TODAY!!  


December 27 - Kit Class, Schmittys, Neillsville
January 9 - Technique Class, Apple Valley, Neillsville
January 11 - Technique Class, Apple Valley, Neillsville
January 31 - Kit Class, Schmittys, Neillsville
 
PRIVATE CLASSES ARE AVAILABLE - CONTACT ME TODAY!


  Cindys Stamping Studio On Line Store
(Just click on the above link to enjoy your Stampin" Up! Shopping!!  Thanks!!


******************************
  • Check out the Clearance Rack, just click on the link on the right hand side.
  • Check out the Paper Pumpkin monthly project kit - subscribe today - Paper Pumpkin Link

Saturday, December 10, 2016

November Stamp of the Month - It's a Celebration

We have so much fun with the Stamp of the Month, I never know which stamp set that the ladies that participate will choose.  What this does for me is make me "think outside of the box and get out of my comfort zone."  November was no exception, the Stamp set of this Month:

This stamp set has so many possibilities and I couldn't wait to dive right in!!  Here are the cards that I came up with.

Card #1 - Happy New Year!
 The picture really doesn't do this card justice, it is just plain pretty!! Using the new Sweet Sugarplum as the color focus and adding Smokey Slate base, made this card so pretty.

Stamp Set:  It's a Celebration
Ink:  Smokey Slate, Sweet Sugarplum, Black
Paper:  Smokey Slate Base, Sweet Sugarplum Layer, Whisper White
Accessories:  Fancy Frosted Sequins, Dimensions, Frosted Ribbon

Card #2 -  Celebrate with Foil!

You can't see it in the picture but the Designer Series Paper used for the background is from the Affectionately Yours Designer Series Paper and is Copper Foil accents. I knew adding this to the card would just be the highlight and off centering the Celebrate would be a great addition. You can use this Celebrate card for so many occasions!

Stamp Set:  It's a Celebration
Ink:  Melon Mambo, Tempting Turquoise, Black
Paper:  Melon Mambo Base, Copper Foil DSP Layer, Black, Whisper White
Accessories:  Silver Sequins, Dimensions

Card #3 - Happy Birthday

Doesn't this card look like fun?!  You could also use this stamp set for the Fourth of July!  The sparkler sticks are part of the stamp set! 

Stamp Set:  It's a Celebration
Ink:  Peekaboo Peach, Basic Grey, Delightful Dijon, Tangerine Tan go
Paper:  Soft Sky Base, Tangerine Tango Layer, Whisper White
Accessories:  Smokey Slate Stitched Ribbon

Card #4 - Celebrate Everthing!
I like trying different colors and this was a great color combination; Daffodil Delight and Smokey Slate, adding the Silver Glitter Tape just set it off.

Stamp Set:  It's a Celebration
Ink:  Daffodil Delight, Smokey Slate
Paper:  Daffodil Delight Base, Whisper White Layer
Accessories:  Silver Glitter Tape, Silver Sequin Stars, Dimensions

There you have it!  The November Stamp of the Month - It's a Celebration!!  Stay tuned I will be posting the December Stamp of the Month choices and if you are interested, you can vote for your favorite also!

Thanks for stopping in!!
Cindy

******************************************************************************
Here is What is Happening:

SIGN UP TODAY!!  


December 12 - Technique Class, Apple Valley Bar & Grill, Neillsville
December 14 - Technique Class, Apple Valley Bar & Grill, Neillsville
December 27 - Kit Class, Schmittys, Neillsville
 
PRIVATE CLASSES ARE AVAILABLE - CONTACT ME TODAY!


  Cindys Stamping Studio On Line Store
(Just click on the above link to enjoy your Stampin" Up! Shopping!!  Thanks!!


******************************
  • Check out the Clearance Rack, just click on the link on the right hand side.
  • Check out the Paper Pumpkin monthly project kit - subscribe today - Paper Pumpkin Link


Saturday, December 3, 2016

December Technique - Water Coloring with Markers!

It's time to check those calendars and think about the December Technique.  I found a great technique that really makes Water Coloring look more professional.  Usually when I watercolor, I see lines in my coloring that makes the image look unprofessional.  My upline and friend, Kelly, shared with me the technique that she uses that makes here images not only look great, but no lines!!


December 2016 Technique Class
 (Here is a sample of the Water Coloring with Markers Technique)


Marker Water Coloring Technique

This technique was shared with me and I love how easy and beautiful it will make Water Coloring! We will be making 3 beautiful Christmas Cards for you to share.

The Marker Water Technique will create a beautiful and professional look to our cards! 

                            Join me for a fun two hours of stamping!!

Monday, December 12, 2016 at
Apple Valley Bar &Grill
Or
Wednesday, December 14, 2016 at
Apple Valley Bar & Grill

6:30 p.m. either night

To help you plan your evening, class usually takes about 2 hours, so you can figure to be done by 8:30 p.m.

 All you need to remember is your adhesive and scissors. 


Class size is limited to the first 10 ladies to sign up!

Feel free to invite a friend, we always enjoy meeting new people and sharing what we love!!  But please remember, the techniques may be over whelming and we want everyone to have a good time. I don’t always the time for one on one teaching. 
Thank you for Understanding.

Cost of the class is $10 for the class, you will make 3 cards (2 Technique Cards and 1 Fancy Project), or the class is FREE if you order $15 (before shipping and handling) of Stampin' Up! Product from me.

Just send me an email if you can make it, I can't wait to show you three great cards.

Happy Stamping!!
Cindy

******************************************************************************
Here is What is Happening:

SIGN UP TODAY!!  


December 12 - Technique Class, Apple Valley Bar & Grill, Neillsville
December 14 - Technique Class, Apple Valley Bar & Grill, Neillsville
December 27 - Kit Class, Schmittys, Neillsville
 
PRIVATE CLASSES ARE AVAILABLE - CONTACT ME TODAY!


  Cindys Stamping Studio On Line Store
(Just click on the above link to enjoy your Stampin" Up! Shopping!!  Thanks!!


******************************
  • Check out the Clearance Rack, just click on the link on the right hand side.
  • Check out the Paper Pumpkin monthly project kit - subscribe today - Paper Pumpkin Link


Thursday, December 1, 2016

November Kit Class Cards

What a great group of ladies we had at the November Kit Class making 15 Christmas cards!!  We had a great time and everyone loved the cards.  So without further ado, here they are!!

Card #1 - Christmas Bells
Stamp Set:  Seasonal Bells
Ink:  Cherry Cobbler, Always Artichoke, Black
Paper:  Cherry Cobbler Base, Whisper White Layer
Accessories:  Dimensions, Bell Punch, Banner Framelit, Cable Knit Embossing Folder, Gllue Dots, Cherry Cobbler Taffeta Ribbon, White Glue

I love the Cable Knit Embossing Folder that is new in the SU Holiday Catalog, it has a 3-D effect and is just perfect for this card!

Card #2 - Peace on Earth
Stamp Sets:  Lovely as a Tree, Holly Jolly
Ink:  Soft Sky, Black
Paper:  Soft Sky Base, Whisper White Layer
Accessories:  Stitched Framelits, White Organza Ribbon, Wink of Stella (Dyed Soft Sky), Dimensions

This card just spoke elegance to me, something as simple of a winter scene of trees, teamed up with a single word "Peace"; what a lovely Christmas Card. I added a little bit of glimmer to the trees by using Wink of Stella that I had added about 10 drops of Soft Sky Reinker to tint it.


Card #3 - Warm Heart Christmas Greetings
Stamp Set:  Cookie Cutter Christmas
Ink:  Black
Markers:  Real Red, Emerald Envy, Delightful Dijon, Pirouette Pink
Paper:  Emerald Envy Base, Delightful Dijon Layer, Presents & Pine Cones Designer Series Paper, Whisper White
Accessories:  Label Framelits, Emerald Envy Ribbon, Dimensions

How cute is this card, I LOVE this stamp set and have used it alot this past month.  It's great!!

Card #4 - Oh Christmas Tree
Stamp Set:  Peaceful Pines
Ink:  Black, Emerald Envy
Paper:  Crumb Cake Base, Emerald Envy Layer, Fabulous Foil Designer Acetate, Presents & Pine Cones Designer Series Paper
Accessories:  Tags & Label Framelits, Perfect Pines Framelits, Dimensions, Silver Glitter Ribbon, Pine Bough Embossing Folder

Using a popular stamp set from the Annual Stampin' Up! Catalog this lovely card was created!  This set was very popular last year and I had almost forgotten about it.  One thing to note that the Designer Acetate sheets have a protective clear film on them, you will want to remove before assembling your card.

Card #5 - Christmas Medallion
Stamp Set:  Frosted Medallion
Ink:  Dapper Denim, Marina Mist, Smokey Slate, Sahara Sand
Paper:  Dapper Denim Base, Whisper White Layer
Accessories:  Dimensions, Silver Sequins

I really liked this Non Tradition Christmas Card; using the Frosted Medallion created the Snowflake look, mixed with hot new In Color Dapper Denim, this card turned out spectacular!

 I hope that you enjoyed our Kit Class Cards, contact me if you would ever like to join us or purchase the set of cards either in a kit or already made.

Happy Stamping!!
Cindy

******************************************************************************
Here is What is Happening:

SIGN UP TODAY!!  
 

November 29 - Kit Class, Schmittys, Neillsville
December 12 - Technique Class, Apple Valley Bar & Grill, Neillsville
December 14 - Technique Class, Apple Valley Bar & Grill, Neillsville
December 27 - Kit Class, Schmittys, Neillsville
 
PRIVATE CLASSES ARE AVAILABLE - CONTACT ME TODAY!


  Cindys Stamping Studio On Line Store
(Just click on the above link to enjoy your Stampin" Up! Shopping!!  Thanks!!


******************************
  • Check out the Clearance Rack, just click on the link on the right hand side.
  • Check out the Paper Pumpkin monthly project kit - subscribe today - Paper Pumpkin Link


Monday, November 28, 2016

November Technique Class Cards - Vellum Overlay

Good Morning Everyone,
Today I want to share with you the fun technique that we did for November.  It is called Vellum Overlay, such a super simple technique and can add so much to your Christmas Cards!!

Vellum Overlay is a great way to add a more subtle look to cards.  By stamping or layering your image on cardstock, cut a piece of vellum the same size and lay it over the top of your image.  Attach the vellum to your card base using dimensions, ribbons or brads.

Here are the cards!!

Card #1 - Star of Light at Christmas

 Stamp Sets:  Star of Light
Ink:  Soft Sky, Black
Paper:  Soft Sky Base, Whisper White Layer, Vellum, Silver Glimmer
Accessories:  Starlight Thinlets, Fancy Frost Sequins, Dimensions, Silver Glitter Ribbon

We used Dimensions to attach the vellum to our Soft Sky Star, then covered the dimension with the Silver Glimmer Star.  Simple is beautiful in this card!!

Card #2 - Christmas Medallion
 Stamp Set:  Frosted Medallion
Ink:  Sweet Sugarplum, Early Espresso
Paper:  Sweet Sugarplum Base, Fancy Frost Layer, Vellum
Accessories:  Fancy Frost Sequins, Sugarplum Frost Ribbon, Dimensions, White Embossing Powder

We attached the vellum to our Sweet Sugarplum Circle using a little glue on the embossed part. Another super simple card that is oh so pretty!

Card #3 - Cookie Cutter Christmas - Fancy Fold (Valley & Mountain Fold)
Stamp Set:  Cookie Cutter Christmas
Ink: Tip Top Taupe, Black
Paper:  Tip Top Taupe Base (Scored at 1 1/8 & 4 1/4), Candy Cane Lane Designer Series Paper, Real Red, Red Glimmer Paper Scraps
Accessories:  Cookie Cutter Punch, Dimensions, 2" Circle Punch, Starburst Die

Add sentiment piece along front fold, making sure to only tape half of the red starburst circle to attach to card base.  The finishing touch was bow ties for the Gingerbread boys and girls!!

And here is the cute inside of our finished card.
I love this card and the added Candy Cane Designer paper that shows on the front of the card when it is closed, is actually attached to the inside of the card.

If you love these cards as much as we did, consider joining us for our monthly Technique Class, we would love to meet you!  If you do not live in the area, these cards are available as a Kit, you receive everything that you need to make them or can also be ordered Already Made.  Contact me if you are interested.

******************************************************************************
Here is What is Happening:

SIGN UP TODAY!!  
 
November 29 - Kit Class, Schmittys, Neillsville
December 12 - Technique Class, Apple Valley Bar & Grill, Neillsville
December 14 - Technique Class, Apple Valley Bar & Grill, Neillsville
December 27 - Kit Class, Schmittys, Neillsville
 
PRIVATE CLASSES ARE AVAILABLE - CONTACT ME TODAY!


  Cindys Stamping Studio On Line Store
(Just click on the above link to enjoy your Stampin" Up! Shopping!!  Thanks!!


******************************
  • Check out the Clearance Rack, just click on the link on the right hand side.
  • Check out the Paper Pumpkin monthly project kit - subscribe today - Paper Pumpkin Link
  Thanks for stopping by,
Cindy


Tuesday, November 15, 2016

October Stamp of the Month Wonder of Christmas

When I first came up with the idea of offering a Stamp of the Month, I wanted another way to Inspire my stamping ladies Create and that they would then Share their creations.  This is something that I have learnt since I became a Stampin' Up! Demonstrator. 

What I did not realize would happen is how much fun that I have when I create the cards that go with the Stamp of the Month.  Since my stamping ladies vote between 3 or 4 different stamp sets and the winner is the one that becomes the Stamp of the Month.  I never know what I will be working with and sometimes I am not even sure if the stamp set is even a favorite of mine.  But I found that it is forcing me to step out of my comfort zone and have fun!  Have fun coming up with cards that I love and if I love them, there is a good chance that my ladies will to. 

So if you have ever considered in participating in a Stamp of the Month, it is alot of fun.  So let's look at the October Stamp of the Month - Wonder of Christmas.

Card #1 - Christmas Blessings
Stamp Sets:  Wonder of Christmas
Ink:  Marina Mist, Basic Black
Paper:  Marina Mist Base, Whisper White Layer
Accessories:  Silver Star Sequins, Sponging

I created a template that after I cut the oval, I used the template to sponge Marina Mist onto the Whisper White cardstock.  I then stamped the angel in black inside the oval.  I love the affect that this gave my card.  A very simple card that is so pretty.

Card #2 - Peace & Happiness
Stamp Sets:  Wonder of Christmas
Ink:  Black
Markers:  Pool Party, So Saffron, Wild Wasabi, Pink Pirouette, Soft Sky
Paper:  Pool Party Base, Candy Cane Designer Series Paper Layer, Whisper White
Accessories:  Silver Medallion, White Doily, 14" Silver Twine, Dimensions

This card ending up being my favorite, I loved all of the elements of this card.  The Designer Series Paper tied everything together and by stamping my sentiment right on the paper kept the angel the central point.

Card #3 - Three Angels
Stamp Sets:  Wonder of Christmas
Ink:  Black
Markers: Dapper Denim, Crushed Curry, Pink Piroquete
Accessories:  Sequins in White & Soft Sky, Dimensions

For this card, I inked up the angel and stamped in three times, took another piece of white cardstock and stamped it again.  The separate angel was the one that I would color and cut out to apply to my card with dimensions.  Isn't it pretty?

Card #4 - Angel Star
Stamp Sets:  Wonder of Christmas
Ink:  Black
Marker:  Soft Sky
Paper:  Soft Sky Base, Whisper White Layer, Copper Foil Star
Accessories:  Dimensions, Gold Cord, Copper Embossing Powder

I stamped the angel with Versamark Ink and embossed with Copper Embossing Powder.  I love how this turned out, it really set off the card.  By cutting out the angel and attaching with dimensions add some dimension to the card.

That concludes our Stamp of the Month, like what you see?  Leave me a comment.  You can still get in on the Stamp of the Month by purchasing the Wonder of Christmas through my Stampin' Up! Store.  Here is the link: https://www.stampinup.com/ecweb/searchresults.aspx

As always thank you so much for stopping!!
Cindy

******************************************************************************
Here is What is Happening:

SIGN UP TODAY!!  


November 14  - Technique Class Direct to Acrylic, Apple Valley Bar & Grill, Neillsville
November 16  - Technique Class, Direct to Acrylic, Apple Valley Bar & Grill, Neillsville
November 29 - Kit Class, Schmittys, Neillsville
 
PRIVATE CLASSES ARE AVAILABLE - CONTACT ME TODAY!


  Cindys Stamping Studio On Line Store
(Just click on the above link to enjoy your Stampin" Up! Shopping!!  Thanks!!


******************************
  • Check out the Clearance Rack, just click on the link on the right hand side.
  • Check out the Paper Pumpkin monthly project kit - subscribe today - Paper Pumpkin Link
 

Monday, October 31, 2016

October Kit Class Cards

Here are the October Kit Class, it was all about Christmas last Tuesday!!  Our ladies made 15 Christmas cards and got a jump on their card making!! 

Don't you love this cute little reindeer?!!  We used the "swirl" die from the Swirly Bird Die Thinlets to create the snow drifts and a red sequin for our reindeer's nose.  I love the Cookie Cutter Christmas, and the fact that this stamp set and punch work great for our reindeer!!


Card #1 - Reindeer Season
Stamp Sets:  Cookie Cutter Christmas
Ink:  Black, Sahara Sand
Paper:  Cherry Cobbler Base, Crumb Cake Scraps, Whisper White,  Candy Cane Lane Designer Paper
Accessories:  Red Sequin, Swirly Die Thinlet, Dimensions, Tomboy Glue

Our second card also used the Cookie Cutter Christmas stamp set and matching punch, this card was so easy but also was alot of fun to make!!
 Card #2 - Gingerbread Christmas
Stamp Set:  Cookie Cutter Christmas
Ink:  Crumb Cake, Early Espresso, Cherry Cobbler
Paper:  Cherry Cobbler Base, Candy Cane Lane Designer Paper Layer, Early Espresso, Whisper White
Accessories:  Cable Knit Embossing Folder, Dimensions, Tomboy Glue

Merry Christmas from our Gingerbread House to Yours!  These cute little houses are part of the Candy Cane Lane Designer Series Paper, you get alot of houses from one sheet of DSP!!
 Card #3 - Gingerbread House Christmas
Stamp Set: Embellished Ornament
Ink:  Memento Black, Emerald Envy
Paper:  Tip Top Taupe Base, Emerald Envy, Real Red, Whisper
White
Accessories:  Pine Bough Embossing Folder, Dazzeling Diamonds Glitter, Dimensions

The Star of Wonder stamp set is such a beautiful stamp set and really brings the true meaning of Christmas to the lucky recipient.
 Card #4 - Star of Wonder
Stamp Set:  Star of Light
Ink:  Pacific Point
Paper:  Pacific Point Base, Silver Layer, Whisper White, Silver Glitter Scraps
Accessories:  Starlight Thinlets, Diamond Jewels, Dimensions

Our last card is another favorite of mine, the Seasonal Bells stamp also has a coordinating punch that made making this card so easy!

Card #5 - Christmas Bells
Stamp Set:  Seasonal Bells
Ink:  Black, Always Artichoke (inside)
Paper:  Always Artichoke Base, Cherry Cobbler Layer, Whisper White
Accessories:  Softly Falling Embossing Folder, Garden Green Twine, Dimensions, Bell Punch

I hope that you like our Kit Cards, we had alot of fun making these lovely cards and the November card class we will make another 15 cards and those will also be all Christmas!!  If you like what you see, feel free to leave me a comment or better yet feel free to Copy/Case/Share with Everyone (CASE) that you also starting making your Christmas Cards.

******************************************************************************
Here is What is Happening:

SIGN UP TODAY!!  


November 14  - Technique Class Direct to Acrylic, Apple Valley Bar & Grill, Neillsville
November 16  - Technique Class, Direct to Acrylic, Apple Valley Bar & Grill, Neillsville
November 29 - Kit Class, Schmittys, Neillsville
 
PRIVATE CLASSES ARE AVAILABLE - CONTACT ME TODAY!


  Cindys Stamping Studio On Line Store
(Just click on the above link to enjoy your Stampin" Up! Shopping!!  Thanks!!


******************************
  • Check out the Clearance Rack, just click on the link on the right hand side.
  • Check out the Paper Pumpkin monthly project kit - subscribe today - Paper Pumpkin Link
 

Sunday, October 23, 2016

October Technique Class - Direct to Acrylic

Our October Technique Class taught us how to stamp with Acrylic Blocks!  By using Acrylic Blocks and ink we also did a different spin on it, the technique is called Direct to Acrylic.

The Direct to Acrylic is a fun technique, we "swiped" the ink across the acrylic block with our ink pads, this created different results every single time, and no two cards were alike.  I found that this made the technique that much more fun!  After swiping the ink pad across the acrylic block, we then stamped the background using the acrylic block right on our cardstock.

Here is Card #1 - Fall Thinking

 Isn't this card fun?!!  By using the negative image of a maple leaf, we stamped the tree from the Sheltering Tree stamp set, I love the results.  We also used the maple leaf that we cut out for the inside sentiment. The ink that we swiped across the acrylic block was Peekaboo Peach and Crushed Curry, by doing this more than once, we were able to achieve just the right darkness for our background.

Stamp Sets:  Vintage Leaves, Sheltering Tree
Ink:  Peekaboo Peach, Crushed Curry, Chocolate Chip
Paper:  Crushed Curry Base, Chocolate Chip Layer, Very Vanilla
Accessories:  Gold Wink of Stella Glitter, Delightful Dijon Grosgrain Ribbon

Card #2 - Thinking of You by the Shore

Here is the second card that we made for technique class.  We swiped Marina Mist for the sky and Tip Top Taupe for the sand.  You can really see the "swipe" marks in this card.

Stamp Set:  Wetlands
Ink:  Early Espresso, Marina Mist, Tip Top Taupe
Paper:  Tip Top Taupe Base, Marina Mist Layer, Whisper White
Accessories:  Rhinestone Jewels

And finally the Fancy Fold Card that we always make, this is a Z Fold Card and when Bernice Seidl gave it to me, I instantly loved it!!  I also could not do a single thing different to this card, I am so proud of Bernie for making this card, I just loved the colors and everything about this card.
Here is the front of the card, the colors are just great and the placement of the Razzelberry Oak Leaf and Acorn just sets off this beautiful Thank You card.

Here is the inside:
Card #3 - Autumn Thanks
Stamp Sets:  Vintage Leaves, Thankful Thoughts
Ink:  Chocolate Chip, Rich Razzelberry, Cajun Craze, Old Olive
Paper:  Elegant Eggplant Base, Cajun Craze Layer, So Saffron, Very Vanilla, Chocolate Chip, Rich Razzelberry, Whisper White
Accessories:  Dimensions, Acorn Punch, Jute Ribbon (dyed Chocolate Chip)

That takes care of our October Technique Class, please consider joining us in November; it will be time to think about Christmas with our November Technique - Vellum Overlay. This class meets twice in November in the Neillsville area, BUT it is also available to purchase as a kit.  Contact me for more information.

As always, thanks for stopping and Happy Stamping!
Cindy
******************************************************************************
Here is What is Happening:

SIGN UP TODAY!!  


October 10 - Technique Class Direct to Acrylic, Apple Valley Bar & Grill, Neillsville
October 12 - Technique Class, Direct to Acrylic, Apple Valley Bar & Grill, Neillsville
September 27 - Kit Class, Schmittys, Neillsville
October 25 - Kit Class, Schmittys, Neillsville
PRIVATE CLASSES ARE AVAILABLE - CONTACT ME TODAY!


  Cindys Stamping Studio On Line Store
(Just click on the above link to enjoy your Stampin" Up! Shopping!!  Thanks!!


******************************
  • Check out the Clearance Rack, just click on the link on the right hand side.
  • Check out the Paper Pumpkin monthly project kit - subscribe today - Paper Pumpkin Link